Tuesday 29 December 2020

Using Netsh for Wi-Fi Troubleshooting


Netsh, or network shell, is very powerful network utility that allows you to display or modify the network configuration of a computer that is currently running.
Netsh, among many other things, also allows you edit wireless settings (for example, SSID), start/stop WLAN, change the key or manage WLAN profiles. To be honesst all these topics are out of scope of this post. 
The key point of this blog post is the Troubleshooting of the Wi-Fi communication. In this post I will show you how you can use the Netsh to localize a Wi-Fi issue from the Windows client’s side. 
By WLAN Troubleshooting it is sometimes important to look at the WLAN issue from the client’s perspective. Using the Netsh you can collect information about link quality, generate a WLAN report with detailed information about all last issues or even capture 802.11 frames.


Contents
  • Netsh SHOW Commands
    • Collecting Wi-Fi link information
      • netsh wlan show interfaces
      • netsh wlan show wlanreport
    • Checking Wireless Adapter Capabilities
      • netsh wlan show wirelesscapabilities
      • netsh wlan show drivers
  • Netsh TRACE Commands
    • Using Netsh for packet capture
    • Useful Netsh Trace Filters
  • Links


Netsh SHOW Commands

Collecting Wi-Fi link information 

netsh wlan show interfaces

Use this command to see specific wireless adapter information, such as radio type, channel number, RSSI, up- and down-link data rate and type of authentication your computer is currently using.

PS C:\Users\itunakin> netsh wlan show interfaces

 
There is 1 interface on the system:
 
    Name                                    : WLAN
    Description                           : Intel(R) Wireless-N 7260
    GUID                                     : d4bced40-c85a-4912-a361-04734932bade
    Physical address                  : d8:fc:93:36:30:17
    State                                      : connected
    SSID                                       : GoGo
    BSSID                                     : 44:4e:6d:90:71:be
    Network type                       : Infrastructure
    Radio type                            : 802.11n
    Authentication                     : WPA2-Personal
    Cipher                                   : CCMP
    Connection mode                : Profile
    Channel                                : 13
    Receive rate (Mbps)            : 144.4    
    Transmit rate (Mbps)         : 144.4
    Signal                                    : 99%
    Profile                                   : GoGo
 
    Hosted network status       : Not available

“Rate” and “Signal” are most important for troubleshooting.

A signal quality between 80 and 100 percent corresponds to, the reliable connection. A signal above 70 percent is still good. Anything below 60 percent means you have a weak signal and this connection is not recommended for time sensitive communication. To calculate the received signal strength in dBm, you can use the formula: (% number / 2) - 100 = dBm. However, this is not accurate for all adapters.

Using the information about received and transmit rates, you can find out which MCS are used for downlink and uplink and, as a result, find out the information about modulation, coding rate, number of spatial streams, channel width, and guard interval. (You can use the MCS table for 802.11ac from the WirelessLAN Professionals’ site found here.) The MCS is sometimes very useful to know. For example, if the signal strength is 90% or more, and the device uses low MCS, it could mean that the receiver is affected by interference. As a result, the transmitter needs downgrade the modulation

To continually monitor and log the output of the 'netsh wlan show interfaces' command I would kindly recommend you look at two scripts from two experienced WLAN engineers:

This script provides the following features and functionality
  • A Windows GUI to continually monitor the output from the ‘netsh wlan show interface’ command
  • Configurable signal strength and data rate thresholds allow the users to control the levels at which the current signal strength and data rates will be disabled in green or red text.
  • An optional log – When logging is enabled, the output from each instance of the ‘netsh wlan show interface’ command will be written to a comma separated csv file in ASCII format so it can be easily opened by tools such as Excel.
  • A roaming log showing each roam.

netsh wlan show wlanreport

It's a very detailed report that can help you troubleshoot many Wi-Fi connectivity issues.

To get the report you must run this command from a command prompt with administrator privilege.

This command generates a report showing recent wireless session information (by default from the last three days)

The WLAN reports contain a graph with details of the connectivity status, including information, such as when the connection started, when it got disconnected, errors, and more.

The graph is interactive. You can point on an icon of a invent to see a description in the summary window or just click on it to see more detailed information.

These events are color coded and can help you to diagnose problems. The summary chart has a definition for each of the different colors.

The report also summarizes network adapters information configured on your system, session success/failures, disconnect reasons, and a lot more. It contains outputs for commands ipconfig /all and netsh wlan show all, among other things.

There is also very helpful summery section which describe disconnect reason.


Options

The duration of the report can be changed. For example, to create the report for last week use the command: netsh wlan show wlanreport duration="7"

 You can provide the path to an .etl file to use as the source of events instead of the machines event log: netsh wlan show wlanreport log="path\file.etl"

 For more details see the article from Microsoft “Analyze the wirelessnetwork report


    Checking Wireless Adapter Capabilities

        netsh wlan show wirelesscapabilities 

Use this command to validate that your device supports WFI Direct, can work as an access point, how many Spatial Streams does it support, is it MU-MIMO capable, what kind of ramming support features dies it support (802.11k, 802.11v, 802.11w)

More information: Miscellaneous technical details and validation


        netsh wlan show drivers

Use this command to view WLAN interface and driver information such as:

  • detailed information about your driver, like driver version, file name, version, date
  • supported Wi-Fi standards
  •  security methods provided by adapters
  • supported radio PHY

More information: How to manage wireless networks using Command Prompt inWindows 10


    Netsh TRACE Commands

        Using Netsh for packet capture

Very often the packet sniffing the only way to understand what is going on in a WLAN and why Wi-Fi is not working properly? Packets newer lie! It is not my thought, but I totally agree with it. 
However, what would you do if you had a roaming issue at a remote site? Sure, if you have access to the infrastructure you can capture packets from access points, but it is difficult to predict which AP will be the next the client roams to. So, sometimes it is impossible to capture WLAN frames on site with a portable packet sniffer or to do it centralized from a controller. In these cases, the only solution is a troubleshooting on client site.

In this blog I would like to share my personal experience and describe how to collect network trace without installing Wireshark on a Windows OS.

Windows has a built-in netsh capture command that allows you to capture network traffic.
  1. Enable tracing for all components produces a lot of log files for processes that are not related to wireless authentication and can consume system resources.
  2. To start the network trace on the Wi-Fi adapter just run the command line (CMD or PowerShell) netsh trace start capture=yes scenario=WLAN traceFile= path\file.etl 
  3. Tracing will stop when the "netsh trace stop" command is issued or when the system reboots. This command takes some time to run. Do not surprise if it takes some minutes to run.
netsh trace start      - is always at the beginning of the command
capture=yes             - ensures network trace is captured
scenario=WLAN     - Troubleshoot wireless LAN related issues
traceFile= path\file.etl - specifies location of the output file. The default location is %LOCALAPPDATA%\Temp\NetTraces\NetTrace.etl

As a result, two files will be generated: 
  • one of them with the extension ETL is a packet capture trace file and 
  • another one with the extension CAB is an archive which contains system Information, technical detail of the wireless adapter, the driver, settings, IP configuration and more.
Unfortunately, this trace will not be opened directly in Wireshark. It does not support this format of trace. To convert the ETL file there are two options:
  • use Microsoft Message Analyzer and export the file to a CAP file. The problem is it does not work for decrypted packets. 
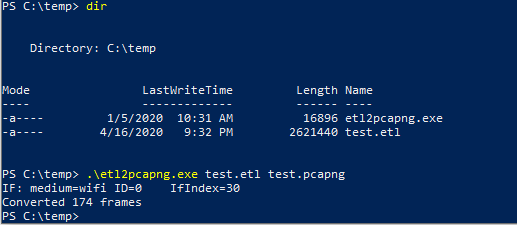
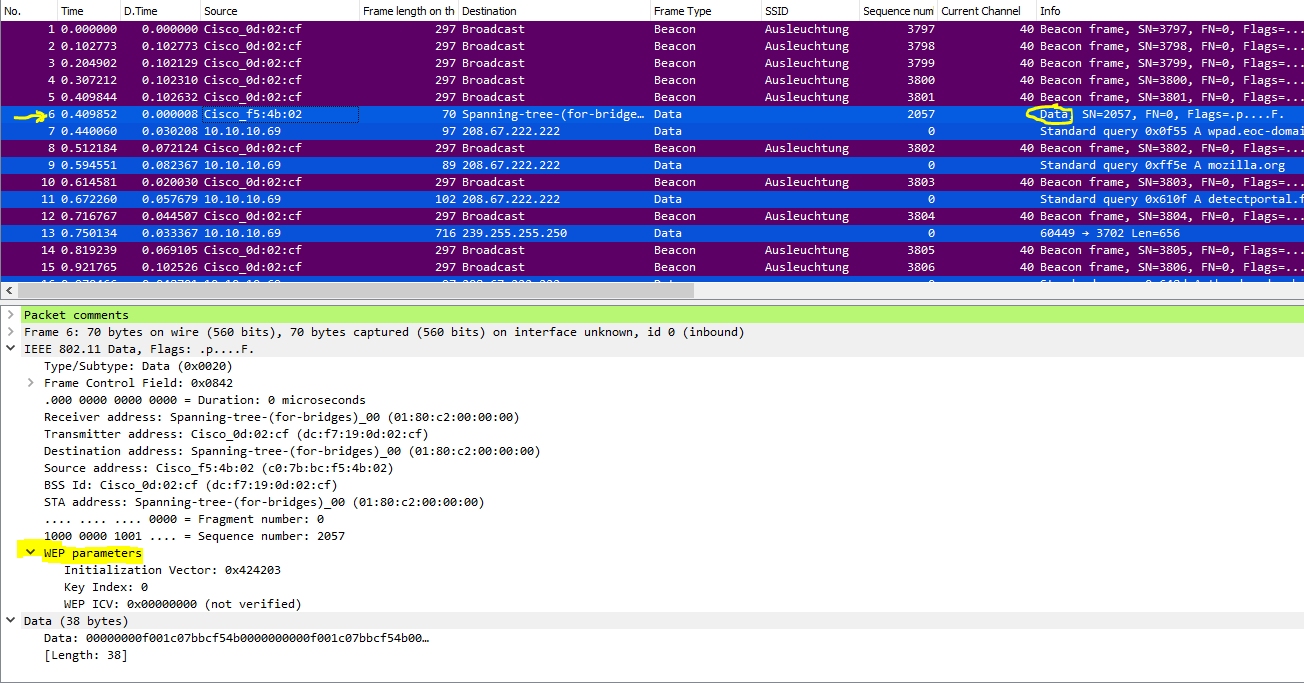
  • use etl2pcapng script (the link is below). It easy to use and you do not need to install any software. Just put the ETL file and the etl2pcapng script in one folder and run the tool with: etl2pcapng.exe in.etl out.pcapng
After converting the file, the tool prints a table which shows mappings between Windows interface indices and pcapng interface IDs.

After the converting you can open the standard PCAPNG file in the Wireshark

The problem is we can only see the traffic in the uplink. The information in all downlink packets cannot be decrypted after the 802.11 header. To solve this problem open protocol preferences and choose ‘Yes - without IV’

Now you can see all details.

    Useful Netsh Trace Filters

Using filters, you can keep your capture file sizes down. This is especially good because you capture data on a client device. Use 'netsh trace show CaptureFilterHelp' to display a list of supported capture filters and their usage.
Most useful filters for Wi-Fi capturing are:

Netsh trace Capture Filter

Wireshark Capture Filter

PacketTruncateBytes=<value>

frame slice value

Ethernet.Address=<xx-xx-xx-xx-xx-xx>

wlan.addr==<xx:xx:xx:xx:xx:>


PacketTruncateBytes=<value> 
If you apply a PacketTruncateBytes value, then captured only the specified number of bytes of each packet. It is working like the frame slice value at the Wireshark
frames will be sliced off after the number of bytes specified in this field. Be careful and do not restrict the packet size too aggressive to be sure you do not lose useful network information from management frames. The largest management frames are beacons. I have never seen a beacon large than 430 bytes. So, I would recommend do not limit the packet size below 450 bytes.
e.g. PacketTruncateBytes=450

 Ethernet.Address=<MAC address>
This is another useful filter for keeping the level of traffic down. Matches the specified filter against both source and destination. For example, you could filter out FF-FF-FF-FF-FF-FF if you interested in broadcast traffic only.

Wifi.Type=<Management|Data>
Matches the specified filter against the Wifi type. Allowed values are 'Management' and 'Data'. If not specified, the Wifi.Type filter is not applied.
Note: This capture filter does not support ranges, lists or negation.
 e.g. Wifi.Type=Management

Links

Microsoft “Analyze the wireless network report”
https://support.microsoft.com/en-us/help/4000462/windows-10-analyzing-wireless-network-report

Analyze the wireless network report
https://support.microsoft.com/en-us/windows/analyze-the-wireless-network-report-76da0daa-1db2-6049-d154-7bb679eb03ed#:~:text=At%20the%20command%20prompt%2C%20type,by%20Wi%2DFi%20connection%20sessions.

Validation Wireless Protection
https://docs.microsoft.com/en-us/windows-hardware/design/device-experiences/wireless-projection-validation-misc

More info: How to manage wireless networks using Command Prompt in Windows 10
https://www.windowscentral.com/how-manage-wireless-networks-using-command-prompt-windows-10

etl2pcapng 
https://github.com/microsoft/etl2pcapng

Data collection for troubleshooting 802.1X authentication
https://docs.microsoft.com/en-us/windows/client-management/data-collection-for-802-authentication

The Windows WLAN Monitor Script – MackenzieWiFi
http://mackenziewifi.com/index.php/2020/01/02/windows-wlan-monitor-script/

The Nigel Bowden’s script to write WLAN netsh information to a file:
https://github.com/wifinigel/win-wlan-data-script

MCS table for 802.11ac from the WirelessLAN Professionals:
https://wlanprofessionals.com/mcs-snr-rssi-chart/

Monday 28 December 2020

DELL laptop broadcasts CF-End frames


Problem description

Some DELL laptops with the Wi-Fi adapter Dual Bund Wireless-AC 8265 and the driver version 19.60.0.7 from 02.04.2017 are broadcasting CF-End frames.


Troubleshooting   

 Well, Who Is This Guy?

The CF-End Frame belongs to the PCF (Point Coordination Function). The PCF is a kind of Wi-Fi with the centralized access control, where AP takes roles of central coordinator.


PCF method and position of the CF-End frame

Some facts about the CF-Frame:

  • it announces the end of the Contention Free Period. In contention free period (CFP), the Point Coordinator (AP) solicits the transmission of a specific STA with CF-Poll (Contention Free Polling)
  • this frame can be sent from AP only.
  • It is the broadcast frame.
  • It is a control frame. So, it is transmitted with the lowest possible MCS
  • It is the short frame and it is 38 bytes long only

·     The PCF as well as HCCA (QoS version of the PCF Access) have not be implemented. The only exception is proprietary iPCF method from SIEMENS.

The first thing you have to check if you see some PCF or HCCA Frame is the signal strength field of the frame. Most likely the signal was to weak. So, it was a malformed frame and Wireshark wrongly classify it as a CF frame.

In our case the signal strength was about 35-39 dBm. So, it was not the issue.  

It was not only one frame. There were grate number of CF-End frames. It looked very strange.

I found out that the CF-End frame flow depends on the activity of the laptop. Sometimes the number of frames jumps up to 320 frames per second. It happens for example after a rebooting of the laptop.

Blue – all frames from the STA; Red – CF-End frames from that STA

To filter out CF-End frame only use the Wireshark filter:

wlan.fc.type_subtype == 30

To see all PCF and HCCA frames type in the display filter field:

wlan.fc.type_subtype in {30 31 33 .. 35 37 .. 39 41 .. 43 46 47}


Conclusion

 If the CF-end frame is so small, why it is so bad?

Well, because it cases the interference in the standard CSMA/CA Distributed Coordination procedure. As all 802.11 Control Frames the CF-end uses SIFS (Short Interframe Spacing). It is much shorter as the DIFS or AIFS. So, this Frame has higher priority in comparison to a data frame. There is no issue from one or few CF-End Frames but is not good if several clients transmit 100 of packets simultaneously.

 As I told at the very beginning affected are DELL laptops with the Wi-Fi adapter Dual Bund Wireless-AC 8265 and the driver version 19.60.0.7 from 02.04.2017

 It is the case when the driver update helps.

After the updating to the 20.70.4.2 driver version the issue was solved.